Generating a Resource
The Material Index Page
In the last chapter we auto-generated the Material resource, added a couple types of materials, then checked out the various pages that were auto-generated for us.
This chapter we’re going to focus on only one of those pages — the index page at /materials — and dig in to the code that backs it. Then we’ll use our knowledge to customize the page and make it our own.
We’re going to start at the route and work our way down to the template.
RESTful Routes
To make our generate resource work, we had to add one line to the web/router.ex file:
scope "/", StarTrackerWeb do
  pipe_through :browser # Use the default browser stack

  resources "/materials", MaterialController
  #...
end
This one line added several routes for us, and is the equivalent of the following seven lines:
scope "/", StarTrackerWeb do
  pipe_through :browser # Use the default browser stack

  get "/materials", MaterialController, :index
  get "/materials/:id", MaterialController, :show
  get "/materials/:id/edit", MaterialController, :edit
  get "/materials/new", MaterialController, :new
  post "/materials", MaterialController, :create
  patch "/materials/:id", MaterialController, :update
  delete "/materials/:id", MaterialController, :delete

  #...
end
Those seven routes are what make up a “RESTful” resource. The four get routes are the various pages that we visited while playing with our app in the last chapter, and the three other routes (create, update, and delete) are the three actions we could take to change the records.
We’ll cover the other six routes later; for now what we care about is that the line resources "/materials", MaterialController ends up giving us (among other things) get "/materials", MaterialController, :index, which is where we’ll find our Index page.
Index Controller Action
We’ve mapped out the url /materials to the index action on MaterialController. Let’s look at that action.
defmodule StarTrackerWeb.MaterialController do
  use StarTrackerWeb, :controller

  alias StarTracker.Trade
  alias StarTracker.Trade.Material

  def index(conn, _params) do
    materials = Trade.list_materials()
    render(conn, "index.html", materials: materials)
  end

  #...
end
A quick review of controllers and all the code that comes before the index.
First, we define our module: StarTrackerWeb.MaterialController. That name is connected with the filename, and with how it connects with views and templates, so don’t mess with it. Next we load in a bunch of controller-related code with use StarTrackerWeb, :controller. Our final piece of setup is our aliases. alias StarTracker.Trade means we can use Trade in the rest of the file without including StarTracker in front of it. In the same way, alias StarTracker.Trade.Material means we can use Material without including StarTracker.Trade in front of it.
Now we can get to the index action itself.
At the bottom we have our familiar render function, which takes the connection (conn), the name of the template ("index.html"), and an optional Map (materials: materials). That part all works like before. The new part is how we get our data.
Instead of hard-coding a list like we did in Chapter 2.6, we’re bringing in data from the database. We call Trade.list_materials(), which we’ve defined in Trade context.
The Trade context
In lib/star_tracker/trade.ex we define the Trade context.
defmodule StarTracker.Trade do
  @moduledoc """
  The Trade context.
  """

  import Ecto.Query, warn: false
  alias StarTracker.Repo

  alias StarTracker.Trade.Material

  def list_materials do
    Repo.all(Material)
  end

  # five other methods, abbreviated
  def get_material!(id) #...
  def create_material(attrs \\ %{}) #...
  def update_material(%Material{} = material, attrs) #...
  def delete_material(%Material{} = material) #...
  def change_material(%Material{} = material) #...
end
This is where we store our interactions with the database, and while exploring the generated code we’ll go over each of the six generated functions in this file.
For now, we’ll just look at the list_materials function.
It’s one line: Repo.all(Material). We’ll get into the database and the various ways you can interact with it later, but for this particular case the naming is really descriptive- we’re going to the Repo (database) and getting all of the Materials.
** Captain’s Log: Why the Trade context?
At first, the Trade context seemed unnecessary. Many of the items are just one line, and only used once, so why not put that code directly in the controller?
However, when my database interactions grew in complexity, I saw the value in having separate functions.
When I started doing stuff beyond the basic CRUD operations, I saw how the reusability was useful.
Finally, when my app became bigger and my crew became more involved, I saw how having all the database interactions in one place let me know where to look for code that effected persistence.
The Material Model
Let’s look at what each Material consists of. We’ve seen this in action, of course, when we were creating and viewing our data, but now we’re going to look at how the Material model is defined.
defmodule StarTracker.Trade.Material do
  use Ecto.Schema
  import Ecto.Changeset

  schema "materials" do
    field :amount, :integer
    field :name, :string

    timestamps()
  end

  @doc false
  def changeset(struct, params \\ %{}) do
    struct
    |> cast(params, [:name, :amount])
    |> validate_required([:name, :amount])
  end
end
We first have the conventional module naming (don’t change it!), and then the use statement that pulls in a lot of model-related functions and macros. Some of those macros are schema, field, and timestamps.
After that we import Ecto.Changeset, which gives us cast and validate_required, among others.
The schema block is where we can view the structure of our model. Within the block you can define various fields.
The first three fields we have here are defined by giving an atom for the name of the field and an atom for the type of the field (:name and :string, or :amount and :integer). These were created by the options we gave the generator.
The next thing we see is timestamps(). This creates createdAt and updatedAt fields for you, which are really useful and are thus included on every generated model unless you remove the timestamps() line. These two datetime fields are not set by the user, but are set by the database itself (based on the current time) when a record is created or updated.
There are other options and ways of defining fields, which we’ll go over later when we run into them.
For now we’re going to ignore the changeset function. We’re also going to ignore the migrations file. We’ll go over both of those in future chapters. For now, we just wanted some context for the index action.
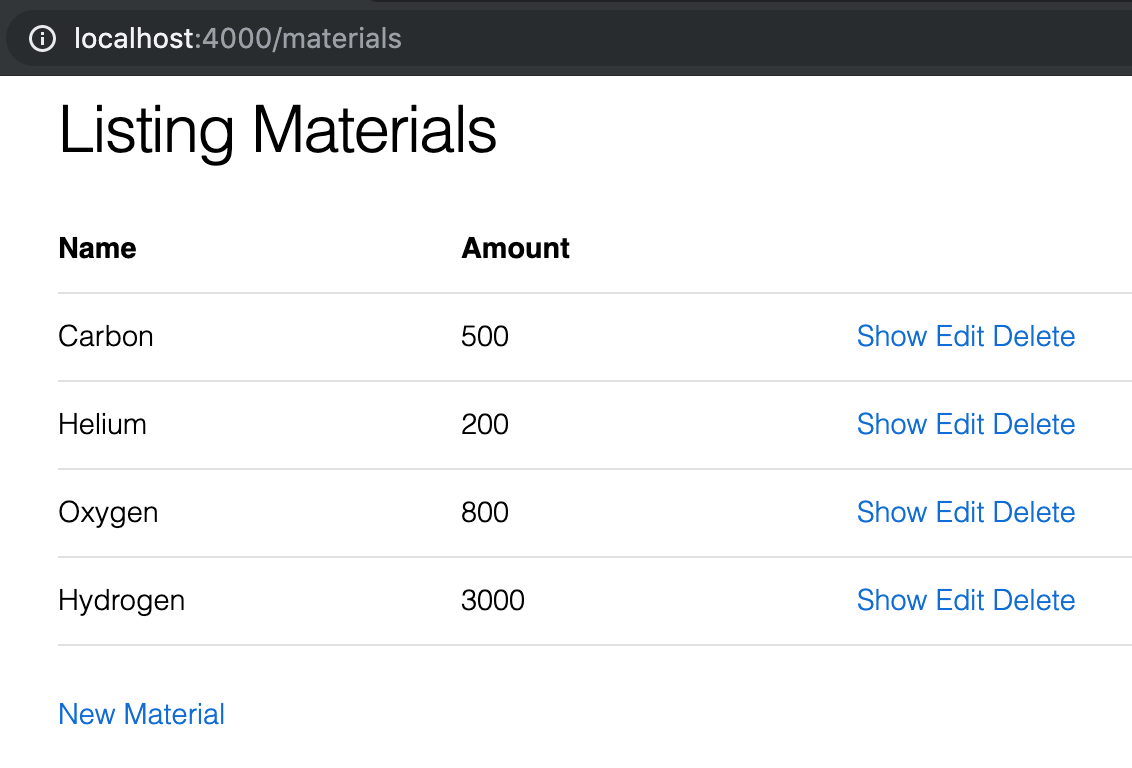
The Index Template
Finally, we get to the template file itself, in /lib/star_tracker_web/templates/material/index.html.eex. It’s long, but you should already recognize quite a bit of what’s going on.
<h1>Listing Materials</h1>

<table>
  <thead>
    <tr>
      <th>Name</th>
      <th>Amount</th>

      <th></th>
    </tr>
  </thead>
  <tbody>
    <%= for material <- @materials do %>
      <tr>
        <td><%= material.name %></td>
        <td><%= material.amount %></td>

        <td>
          <%= link "Show", to: Routes.material_path(@conn, :show, material) %>
          <%= link "Edit", to: Routes.material_path(@conn, :edit, material) %>
          <%= link "Delete", to: Routes.material_path(@conn, :delete, material), method: :delete, data: [confirm: "Are you sure?"] %>
        </td>
      </tr>
    <% end %>
  </tbody>
</table>

<span><%= link "New Material", to: Routes.material_path(@conn, :new) %></span>
We start off with our h2 header, giving the user an idea of what the page is about.
The rest of the page is a big html table.
A table consists of a table header (thead) and a table body (tbody). The table body is made up of rows and columns of data. The table header is where we put the titles of each column.
<thead>
  <tr>
    <th>Name</th>
    <th>Amount</th>

    <th></th>
  </tr>
</thead>
Within the thead element we have one table row (tr), and in that row we have three th elements- the first two holding titles of the columns and the last one being a blank placeholder.
Then we have the body of the table:
<tbody>
  <%= for material <- @materials do %>
    <tr>
      <td><%= material.name %></td>
      <td><%= material.amount %></td>

      <td>
        <!-- links go here -->
      </td>
    </tr>
  <% end %>
</tbody>
We’ve removed some of the links so we can focus on the structure, and better see its similarities with the table header.
Right within our tbody tag we see a for block which goes over every item in @materials. This means that whatever is within the for block will be repeated for every material.
So for every material we create a table row (tr), and within the table row we create three table data (td) elements. The first two display data from the material record that’s in this instance of the for block. The last one contains several buttons. Let’s look at those.
<td>
  <%= link "Show", to: Routes.material_path(@conn, :show, material) %>
  <%= link "Edit", to: Routes.material_path(@conn, :edit, material) %>
  <%= link "Delete", to: Routes.material_path(@conn, :delete, material), method: :delete, data: [confirm: "Are you sure?"] %>
</td>
These use the same link helper we went over in chapter 2.6, but here they use more options and are considerably more complex.
The Expanded link Helper
Let’s analyze our first link helper:
<%= link "Show", to: Routes.material_path(@conn, :show, material) %>We start off with the name of the helper (link), followed by the text that will show on the page ("Show"). Then things start diverging from how we used the link helper before.
In the to option, we’re using another helper in order to construct the URL that the link will be linking to.
Routes.material_path(@conn, :show, material)I call this the x_path helper to signify that it’s not just materials that it works with. If we had an Officer resource, then we would have an officer_path helper available.
To see the helpers available, and which routes they work with, run mix phx.routes in your command line.
$ mix phx.routes
material_path  GET     /materials                             StarTrackerWeb.MaterialController :index
material_path  GET     /materials/:id/edit                    StarTrackerWeb.MaterialController :edit
material_path  GET     /materials/new                         StarTrackerWeb.MaterialController :new
material_path  GET     /materials/:id                         StarTrackerWeb.MaterialController :show
material_path  POST    /materials                             StarTrackerWeb.MaterialController :create
material_path  PATCH   /materials/:id                         StarTrackerWeb.MaterialController :update
               PUT     /materials/:id                         StarTrackerWeb.MaterialController :update
material_path  DELETE  /materials/:id                         StarTrackerWeb.MaterialController :delete
    page_path  GET     /                                      StarTrackerWeb.PageController :index
    page_path  GET     /info                                  StarTrackerWeb.PageController :info
    page_path  GET     /info/:name                            StarTrackerWeb.PageController :info
    page_path  GET     /info/:name/:position                  StarTrackerWeb.PageController :info
    websocket  WS      /socket/websocket                      StarTrackerWeb.UserSocket
Right now we have material_path and page_path (and websocket), but this list will grow.
So the x in x_path is by default the name of the controller. The first argument is a connection (@conn), the second argument is an atom giving the name of the action on the controller, and then the rest of the arguments are parameters to the route. When the parameter is an id, we can give either the id itself or an object which has an id field.
So going back to our material_path for show:
Routes.material_path(@conn, :show, material)We can see that the parameter we give it is the material object, from which we’ll extract the id.
The edit link helper is very similar to the show link helper and has no new concepts:
<%= link "Edit", to: Routes.material_path(@conn, :edit, material) %>The delete link helper does introduce several new things:
<%= link "Delete", to: material_path(@conn, :delete, material), method: :delete, data: [confirm: "Are you sure?"] %>The first new thing is method: :delete. By default, the method is :get, and that’s what’s been in all the links we’ve gone over so far. get is what we use when we want to view a page or get data. However, to make changes to the data we’ll need to use :post, :patch, :put, or :delete. Our router will recognize the method used and direct us to the correct action.
Then we have data: [confirm: "Are you sure?"]. This makes it so that when we click on the button, it will pop up a confirmation box with the text “Are you sure?”. If you hit “OK” it will continue on. If you hit “Cancel” it will stop and not perform the deletion. Try it for yourself in the browser!
Data confirmation can be used on a link with any method, but it’s most commonly used for links with the :delete method.
Finally, we have one last link at the bottom of the page, for new.
<%= link "New material", to: Routes.material_path(@conn, :new) %>The interesting thing here is that there are no parameters passed, since the new action doesn’t take any parameters.
Conclusion
This chapter explored how the materials index route worked, from top to bottom.
We started with how web/router.ex used the resources macro to generate the 7 RESTful routes for materials, then moved on to deconstructing our controller action, followed by a quick detour into our Material model, and finally getting to the index template, which was mostly review except for the table elements and new link helper options.
In the next chapter we’re going to do the same for the show route. It should be a shorter exercise, since it shares many things in common with the index route, but we’ll still learn several new things.
Exercises
- Add a column to the table:
updatedAt. Make sure to add it to the header as well. - Add
createdAtcolumn to the table. - Convert
Routes.material_path(@conn, :edit, material)to the raw string form we used in chapter 2.6. This is not because the raw string is better (x_path pattern is preferred), but so you can get practice figuring out what the x_path helper translates to. Make sure it works for all the materials, not just one. - Take the
tofield from the links on the info page and usepage_pathto define them.
Buy the Ebook